By general request (ahum, read: two people asked, but what can I say, I'm a people pleaser :)), I decided to make a tutorial on the rolled flowers I made. There are many ways to do this, but this is the way that works best for me.
Step 1: Make circles! You can cut them out, but I'm lazy, I punch them out :).
Step 2: Cut a spiral shape in the circles.These can be very random and uneven, that adds to the charm of the flowers :). I drew out the general shape on one of the circles for the purpose of this tutorial, but I actually never use it, I just jump in there and cut.
Step 3: This is optional, but if you want the edges of the flowers to have some colour, it's a good idea to do it now.
Step 4: Take the outside of the spiral, and gently roll it with your fingers. Some people like to spiral it around something fine, but for me this works best. Just try not to push too hard 'cause then you'll crease the paper and make triangles instead of circles.
Step 5: Keep on rolling....
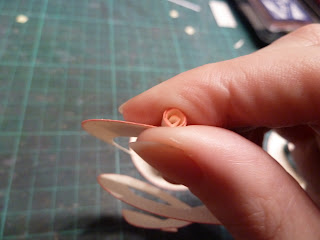
Step 6: Once you've rolled a couple of times, I find it easier to hold the paper between my fingers like I did in the picture below, and roll the paper around with the other hand. That way the top and vottom of your flower will stay together.
Step 7: Keep on rolling untill you reach the end.
...and this is what you have left on the bottom
Step 8: Roll the end of the paper (the inside of the circle you started of with) under your rolled flower.
This is what you should end up with. If you want a tight flower, leave it as it is, if you want a larger, looser one, pull out the bottom a bit, or just leave it on your desk for a while, it'll unroll on it's own.
Step 9: Put some glue on the bottom part of your flower.
...and hold it tight between your fingers so it can dry in the right shape
Tadaa....
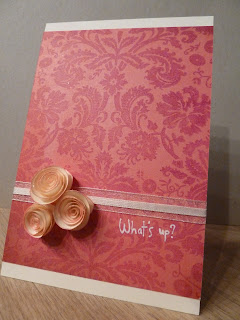
Then just pop them unto a card like so, and tadaaa! (By the way, this is one of my new stamps from HA and I must say... I am in loooove!)
Thanks for visiting and good luck with the flowers!
Love, me


Beautiful card, Sarah....and I love the tutorial, your photos are great, really easy to follow!
BeantwoordenVerwijderenThanks so much!
Thank you for this tutorial! great pictures!
BeantwoordenVerwijderenBedankt Sarah voor de uitleg! Dit ga ik zeker ook eens proberen. Fantastische kaart: eenvoudig, elegant ... mooi!
BeantwoordenVerwijderenGreat tutorial, Sarah - I haven't ever inked the edges, but I like how they look when you do! Beautiful card!
BeantwoordenVerwijderen